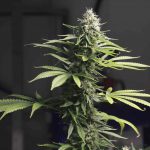
Have you seen any yellow or brown patches on your autoflowering cannabis plant’s leaves when it’s flowering? Unfortunately, cannabis leaf septoria may be afflicting your plant.
What is cannabis leaf septoria?
When cultivated outdoors, autoflowering cannabis plants are especially sensitive to a fungus called Cannabis leaf septoria, often known as ‘yellow leaf spot.’
The fungi Septoria neocannabina and S. cannabis cause this plant disease. Cannabis leaf septoria can be transferred to your plant by bacteria, nematodes, animals, and other plant disease agents. A warm, moist atmosphere is ideal for the growth of spores.
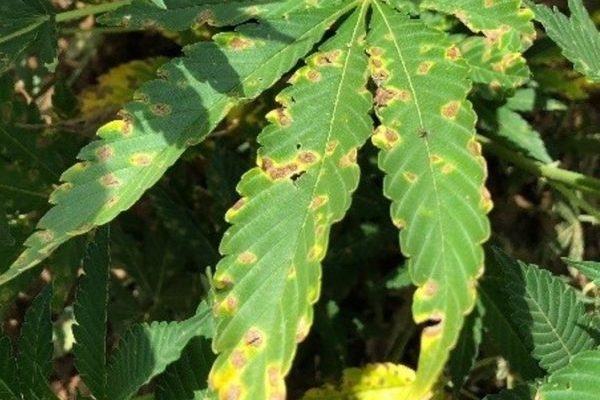
Flowering plants are frequently affected by cannabis leaf septoria, which appears as soon as the plant begins to blossom. It starts on the lower leaves and progressively works its way up to damage the uppermost layers of the leaf as it spreads. The fungus may also spread to the stem if it is infected there.
See also:
- Cannabis Leaves Turning Yellow
- Cannabis Leaves Curling Down
- How To Get Rid Of Powdery Mildew During Flowering
What is the danger of cannabis leaf septoria?
Pot leaf septoria may cause havoc in your autoflowering cannabis grow if it isn’t kept under control early on.
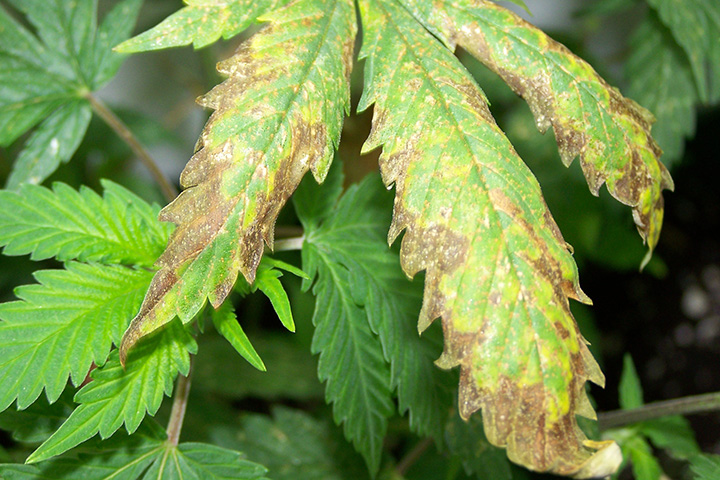
This disease affects the health of your cannabis plant by interfering with leaf functions including photosynthesis and damaging foliage, as well as reducing the amount and quality of your crop’s production. Dry, dying, and even falling leaves are all possibilities when dealing with damaged leaves.
Cannabis leaf septoria, while not a life-threatening illness, can weaken your autoflowering cannabis plant’s defenses, resulting in a subpar crop.
How to treat cannabis leaf septoria?
To begin treating your plant for leaf septoria, you must remove all of the infected leaves.
Destroying old, diseased foliage will improve circulation and reduce your plant’s exposure to leaf septoria vectors. Getting rid of diseased leaves alone may be enough to stop the disease from spreading further, depending on how far it has already advanced.
Here are some treatment suggestions for leaf septoria that you may put into practice:
Introduce a fan, open all of your windows, and leave some space between your plants to improve air circulation. Improved ventilation has been shown to reduce humidity by as much as 50%.
Do not water your plants in the evenings or at night since they need it the most. By managing water, it is possible to avoid the formation of mold and other microorganisms.
Aim for a maximum 5 degree Celsius change in temperature between day and night in your cannabis grow. Plants recover more quickly when the temperature fluctuates within a limited range.
Neem oil and a 20 percent horsetail tea solution are two organic remedies that can aid your marijuana plant in the fight against marijuana leaf septoria, a fungal infection. Every fifteen days, give your plant a spray of this solution.
Tips On How To Prevent Septoria On Cannabis Leaves
When dealing with leaf septoria, early diagnosis is critical as it is with most other garden pests and diseases. Keep a watchful eye on your plants when the weather is hot and humid, as well as when the flowering cycle is just getting started.
Once you’ve found the illness, make sure to take the following actions to stop it from spreading:
1. Remove Infected Foliage
Removing diseased leaves is the first step in properly treating leaf septoria. You can typically stop the spread of the illness if you catch it early enough by burning or eliminating all of the diseased lower leaves.
If the illness hasn’t yet spread to the tops of your blooms, you may probably avoid this stage unless you really want to. Removing blooming foliage will make a plant more weaker and its buds will be of lesser quality as a result.
2. Improve Air Circulation
Proper air circulation is critical for cannabis plants because it helps keep pests and illnesses under control.
Adding an extra fan to your area and providing some space between your plants might help improve air circulation if you’re growing indoors. However, if you’re doing this in the open air, it may be more challenging.
The act of pruning can also aid to improve the flow of air within and among plants. Trim back any too bushy portions of your plants to keep leaves from touching or overlapping.
Elevating your plants so that they catch more breeze may be a good idea if you’re working in the garden while it’s still warm outside. Alternatively, if you can, use an electric fan to circulate the air around your outside plants.
3. Avoid Moisture
Fungal spores spread and germinate mostly because of moisture. As a result, moisture should be avoided at all costs.
Avoid watering your plants from above, since this may wet their leaves, and think about watering them less frequently to allow the soil to fully dry out. Also, water in the morning so that the soil has time to dry out.
4. Mulch
During the fall and winter months, fungus spores may be found in soils where they wait to germinate until the conditions are perfect.
The only way to prevent spores from spreading to your plants is to avoid changing your growth medium in the middle of the process.
To begin, remove any dead leaves and rake the soil to eliminate any diseased plants that may have grown there. After that, make sure your soil is completely dry. Finally, cover your soil with a heavy layer of mulch and water your plants.
As a result, fungus spores won’t be able to travel from the soil to your plants.
5. Remove Weeds
Septoria lycopersici spores frequently inhabit night shadow and horsenettle. Make careful to eliminate any weeds that might serve as hosts for the fungus by running through your yard.
6. Keep Track Of Temperature And Humidity
Keep in mind that hot, humid weather is conducive to the development of leaf septoria. This means that you should lower the humidity and temperature in your grow room if you have an illness (where possible).
7. Apply Fungicides Or Natural Oils
Steps 1-6 may be sufficient to eradicate a mild case of leaf septoria and prevent it from spreading. However, if the illness is severe, you may have to resort to stronger fungicides to combat it.
Fungicides and disease control sprays with a broad spectrum of activity are typically sufficient. Consider using a copper-based fungicide for further security. Either way, when applying a disease control chemical, make sure to follow the package directions carefully and avoid getting any on your buds.
Essential or horticultural oils like neem are good options if you want something more natural. Neem oil may be sprayed to your plants with ease using a mister and is widely used to treat a wide range of garden pests and illnesses.
Try eucalyptus, rosemary, lemon, and cinnamon oils as an alternative. No matter how you use them, keep in mind that these oils contain potent smells and should never be allowed to come in contact with your buds.
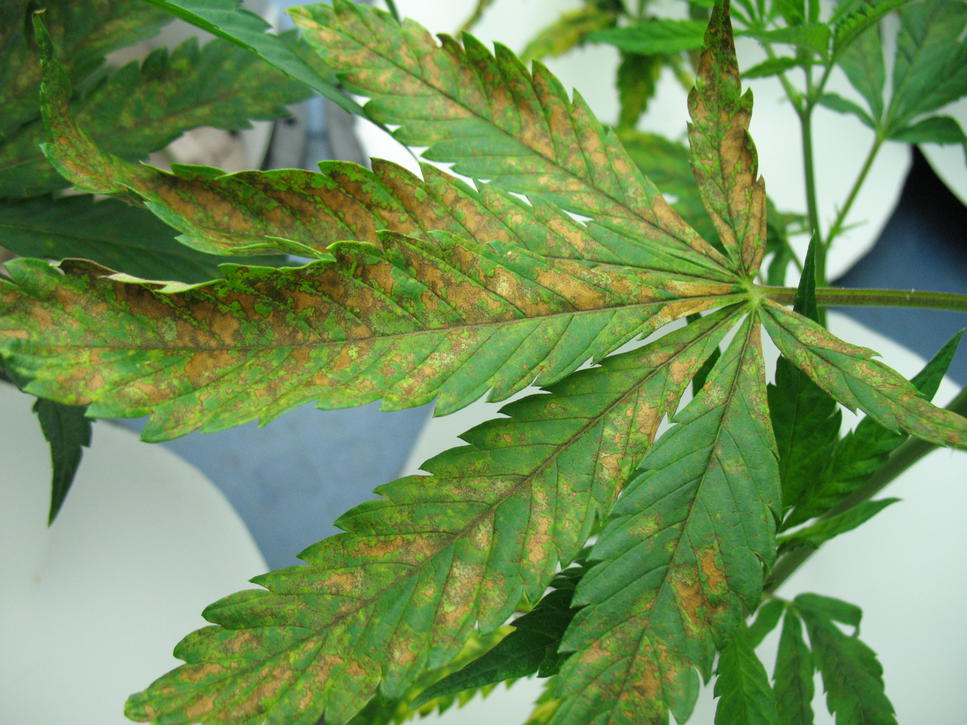
Brown Spots on Cannabis Plant Leaves During Flowering
In most cases, these dark or rust-colored patches on your marijuana leaves indicate the presence of mold, an insufficient supply of the nutrients calcium or magnesium, or nutritional burn.
Magnesium Or Calcium Deficiency
A magnesium or calcium shortage can cause rusty brown patches, however magnesium is more often deficient than calcium.
When your weed plants are blossoming, a modest deficit will not impact them badly, but the symptoms of a deficiency will worsen when they are flowering (since the plant uses up more of these nutrients when flowering).
However, if you don’t do something about it, the problem will just become worse. Starting with a few rust spots on the plant’s middle-aged (those towards the top), the rust eventually spreads throughout the entire plant. Flower output has been reduced to a minimum at this time.
Of course, if you fix the problem only to find out later that it wasn’t the real problem at all, you’ve just made things worse. Calcium and magnesium deficiency might cause this. That will be discussed further down.
To begin, we want to ensure that the rust patches are caused by a lack of magnesium or calcium in the plant (whether it is because you are not feeding it enough or because those nutrients are locked out). Symptoms of a Mg or Ca shortage are often seen (but not always) in other conditions such as these.
Additional Symptoms Of A Mg or Ca Deficiency
Calcium shortage might result in curled lower leaves, so keep an eye out for that. A lack of magnesium causes the leaves to yellow while the veins stay green.
These are signs that your plants are deficient in one of these minerals if you notice either of them. There is no fungus causing the problem. That said, giving your plants additional calcium or magnesium isn’t a given just because of this fact. In other words, no matter how much they receive, they will never be able to use it all.
Nutrient Lockout
When a nutrient is blocked from entering the body, it’s called nutritional lockout. Numerous factors can contribute to this, but the most prevalent one is an imbalance in the pH level.
The pH ranges in which various nutrients are best absorbed vary. Nutrient absorption is reliant on pH levels being within a certain range. It can’t get in since it’s locked up.
The pH of the soil should be maintained at 6.8 for marijuana plants (5.8 for hydro and other soil-less media). Every necessary vitamin can be absorbed in such amount, thus none of them are deprived.
A highly moist and/or cold root environment, or a high potassium, ammonia, or calcium to magnesium ratio, or the reverse for calcium, can also induce nutritional lockout.
The most common reason for a magnesium or calcium deficit is magnesium or calcium lockout. Before increasing nutrient levels, ensure sure this is not the case in your instance. That’ll be covered in more detail in the next section.
Ca and Mg Deficiency Treatment
To begin, rule out nutritional lockout as a possibility. Test the pH of the soil after it has soaked through the pot by testing the water discharge.
If a digital pH meter, such as this one, is out of your price range, you may use testing sheets instead. Do not, however, rely on soil testers, which are notoriously unreliable.
Calcium is best absorbed in soil with a pH of 6.5 or 9.1 (without soil, 5.4 to 5.8), and magnesium in soil with a pH of 6.5 to 9.1. (5.8 to 9.1 for soil-less growing). Nutrient deficiencies are most usually caused by pH levels that are either high or too low.
To remedy the issue, raise the pH a few points. As previously stated, you desire a soil pH of 6.8 and a soilless media pH of 5.8.
Your pH is perfect, but your plant isn’t getting enough calcium or magnesium because of nutrient deficiency. Increase the quantity of the deficient nutrient and observe the impact on the plant. Too much of any of these two nutrients can cause a deficiency in the other.
Burning of Nutrients
If fungus or nutrient shortage aren’t to blame, the problem may be due to nutritional burn. There are too many nutrients being given to your plants.
To begin resolving the problem, do a flush on the system. This entails just watering your weeds to remove all of the soil’s residual nutrients. Your plants will begin to wilt if they run out of nutrients.
To avoid this, cease flushing and begin replenishing your body’s nutrition as soon as possible. Reduce the amount of water you’re giving your plants by half and keep an eye on the results. Adapt the quantity to your needs by increasing or decreasing it.
Final Thoughts
There are several reasons why cannabis leaves develop brown patches. Find out what problem your plants have initially. You’ll be able to fix it once you realize what’s wrong.
However, if your problem is due to nutrient deficiency, there is no way to know how much of each nutrient your plants require. There are so many variables that you’ll have to keep experimenting with the quantities until you find one where the plants no longer display indications of nutrient burn or deficiency, such as rust patches or other indicators of nutrient burn.
Because cannabis is such a hardy plant, even if you abuse it or neglect it, it will still thrive and bear fruit. It won’t produce as much as a healthy plant would, so it’s important to keep working at it until you see results.