Growing your own weed can be hard sometimes and complicated, but it is a very satisfying. When you grow your own plants you don’t have to worry about quality and quantity and you can choose the strain that you like the most.
There are several different ways to grow weed indoor and outdoor. Each method has its pros and cons. One of the most advanced methods for growing marijuana is HYDROPONIC WEED GROW.
Best Led Grow Lights For Growing Weed Indoor:
[amazon bestseller=”Best led grow lights” items=”5″ price=”hide”]
[su_note note_color=”#eccdde” text_color=”#0d100c;”]Now, when I first thought about growing my own weed, I was thinking about outdoor growth. I never dreamt that I will end up with the hydroponic system in my garage. To be honest, I wasn’t quite sure what hydroponic system is at all.[/su_note]
Now, if you made the same decision as I did, you probably think that growing your own weed is extremely hard and complicated. That’s exactly what I first thought, but I was determined to do this and I started to do research.
I did some research on the internet and realized that indoor growing with the hydroponic system is much more productive and much stealthier way to grow your own weed. I finally decided to go with hydroponics.
After some internet research, I bought a bunch of books and instructions for indoor growing. The problem that I found was that the most of these books were too much for a beginner like me to handle but I didn’t give up, and very soon I had my hydroponic garden all set up and ready for production.
Now when I became an experienced grower, I started to think about the fact that most of the people who decide to grow their own weed will give up on the idea because it seems too complicated.
This is the reason why I decided to write this guide. I will try to write everything as simple as possible and to explain everything you need to know about the hydroponic systems. These few pages of text will contain all the information you need and after reading it you will be ready to set up your own hydroponic garden and start the production.
It took me some years of research and hard work to gather up all of this information that I’m about to share with you, so I’m asking you to respect that and keep my secrets in your garden.
NOTE: Before we begin with the guide, here’s the list of the equipment required for hydroponic garden. You’ll need:
- Lighting (best LED grow lights or MH and HPS grow lights) and ballast
- Lighting hangers
- Media and containers
- Ventilation fans Read Full Best Inline Fans For Cannabis Grow Rooms Here!
- Ducting
- Reservoirs, pumps and tubing, (Best Air Pump for Hydroponics)
- Timers
- Temperature/humidity gauge, Read Full Best Hygrometers For Grow Room
- Oscillating fans
- Dehumidifier Read Full Best Humidifier / DeHumidifier For Grow Room/Grow Tent Reviews
- Humidifier
- pH and PPM meters
- Additives and nutrients
- Reflectors, Best Reflective Material For Grow Room
- Filters for odor control, Read Best Carbon Filter For Grow Room
- Scissors and trimmers
- Magnifying glass
- Dry nets
- Soil Test Kit
- Digital Scales
- Weed Soil
- Hydroponic Tower
- Grow room Heater
- Hydroponic Trays

[su_button
url=”https://shop.ilovegrowingmarijuana.com/collections/all?aff=4083″ target=”blank” rel=”nofollow” background=”#008000″ size=”6″ icon=”icon: hand-o-right” icon_color=”#ffffff”]BUY MARIJUANA SEED HERE[/su_button]
What is marijuana hydroponics?
The name “hydroponics” comes from the Latin language and it literally means “water working”. This is the method where you grow marijuana in a flow or bath of water that’s enriched with nutrients and highly oxygenated.
Growing marijuana using this method means that there is no soil and plants grow in a sterile, inert growing medium. All of the nutrients necessary for the plant’s growth are mixed into a solution with water.
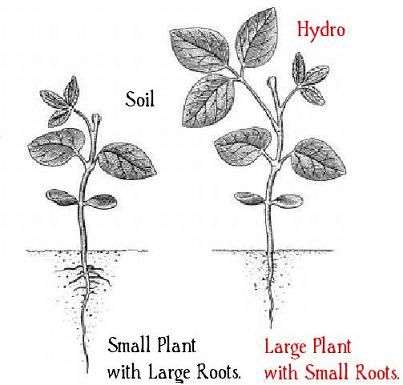
The hydroponic method provides the nutrients, water, and air to the plant through the mediums for growth and because there is no need for massive root webs or extra energy to absorb the nutrients, the plants grow much faster.
To have the perfect crops, you need to control the entire atmosphere in your hydroponic system because the plants absorb the nutrients from both water and air.
The hydroponic system is ideal for drought-stricken areas because almost no water gets lost to evaporation.
Nutrients for marijuana growth
All plants, including marijuana, don’t really require soil. What they need are some elements from the soil. Those elements are: Potassium (K), Phosphorous (P), Nitrogen (N), Sulfur (S), Magnesium (Mg), and Calcium (Ca). These are known as MACROELEMENTS.
There are also some MICROELEMENTS needed for healthy growth of your plants, like Copper (Cu), Zinc (Zn), Boron (B), Molybdenum (Mo), Manganese (Mn), Chlorine (Cl), and Iron (Fe).
When you grow your marijuana plants with the hydroponic system you create a perfectly balanced nutrient solution by mixing these nutrient salts with water.
You can create an all-purpose nutrient solution with all of the secondary elements and it will get your plant through all of the growth stages, but sometimes it’s better to adjust nutrient levels depending on the stage of growth.
[su_note note_color=”#cefbf9″]We would recommend that you buy nutrients in a form of powder that can be mixed with water. It is way cheaper compared to the pre-mixed nutrient solutions and you can adjust the percentage of the nutrients by yourself.[/su_note]
[amazon box=”B00572026S” price=”hide”]
When talking about nutrient solutions, we usually refer to it by the percentage of the Nitrogen, Phosphorus, and Potassium (N-P-K). For example, 15-15-15 solutions contain 15% of N, 15% of P, and 15% of K. the rest of the solution are water and trace elements.
[su_note note_color=”#a7ee9e” text_color=”#0d100c;”]Top 10 Cannabis Nutrients Guide & Reviews.[/su_note]
Nitrogen
Nitrogen is one of the most important parts of every plant. It’s a building material for enzymes and proteins and most importantly, chlorophyll. Chlorophyll is the green pigments responsible for the color of the plants and photosynthesis.
During the vegetative phase of growth, if the temperature in the grow room is below 80 degrees you will need a higher amount of Nitrogen. On the other hand, if the temperature is higher than 80 degrees you don’t have to worry about the higher concentration of N in the formula.
20-20-20 or 12-6-6 with additional trace elements should do the job during the vegetative phase.
Phosphorus
Phosphorus is also a very important element that helps plant transform solar energy into chemical energy. It’s very important for the maturation of the plant and for the immune system of the plant.
Phosphorus is also important for the creation of terpenes, oils waxes, and plant sugars, giving marijuana its flavor.
Your plant will need a lot of Phosphorus during its flowering phase. Recommendable solutions for this phase are: 2-4-3, 5-20-10, or 15-30-15.
Potassium
Potassium is essential for early plant growth, photosynthesis, and protein production, as well as the flower formation. This element is responsible for the movement of nutrients, sugars, and water in plant tissue.
Additionally, the Potassium is vital for longevity and stand persistence of the plant. The roles and functions of the Potassium in plant growth are all general but extremely important for the crop production.
Calcium
Calcium is an important part of the cell walls of the plants. This element provides the strength of the plant as well as the retention and transport of other elements.
Magnesium
Magnesium is an essential element for photosynthesis as it is a part of chlorophyll in all plants. Magnesium also activates many of the plant’s enzymes required for plant growth.
Sulfur
Sulfur is necessary for proper growth of the root and for seed production. It has many different functions in a plant metabolism and it is very important for the production of vitamins, enzymes, and proteins.
Trace elements
Trace elements are as important as all the others, but when it comes to marijuana, only small amounts are required for proper functioning. Trace elements required for healthy marijuana growth are Manganese (Mn), Chloride (Cl), Molybdenum (Mo), Zinc (Zn), Boron (B), Copper (Cu), and Iron (Fe).
Non-essential additives (vitamins and amino acids)
Non-essential additives are the substances that marijuana plant produces on its own and it doesn’t really need an external source for growth, but they can aid the growth and flowering significantly.
In some of the pre-made nutrient solutions, there are some of these non-essential additives, but their role in the increasing of the growth is not proven. So, you can experiment with those if you like, but we recommend that you do so when you are already experienced in marijuana growth. If you are a beginner, you better stick with the basics.
Fertilizers necessary for marijuana growth
Classic fertilizers are used when you grow your plants in the soil. When it comes to hydroponics, all of the nutrients go into the nutrient solution. Therefore, the water you use is also the fertilizer.
The important thing to remember is that too much of the fertilizer can kill your plant, so don’t over fertilize it. Under fertilized plant will grow slower, but it won’t die. If you are not sure, it’s best to follow the instructions on the solution package and it’s always better to use less than more.
The water in your tank will evaporate and get absorbed by the plants, so the water level in the reservoir will drop. When this happens, simply refill the reservoir with tap water that you left to age for 3 days. Do not add any nutrients when refilling the tank.
You’ll need to change the solution of nutrients once every 2 weeks. This means you have to discard the old nutrient solution and clean the entire system. Clean everything that is used with hot water. After that, you can add the water and nutrients to the reservoir.
Required measuring instruments
[su_note note_color=”#cefbf9″]If you are serious about this “hobby” and you want to maximize your harvest you are going to need some tools. It is really hard to optimize the growth if you don’t know precisely the balance of nutrients in your solution.[/su_note]
To monitor the balance of nutrients and correct any imbalances, you’ll going to need a pH and PPM meters. The pH meters will help you determine the acidity of the solution which is very important for the healthy growth of your plant.
The PPM meter determines how many Parts Per Million of certain element is in your solution. The N, P, and K, as well as the other nutrients, are naturally found in rock form and then turned into a powder which is water-soluble. You want to know exactly how much of these elements are in your solution because you don’t want too much or too little of them in it. Also, you need different amounts in different growing phases.
- pH meters – Most of the strains for hydroponic growth require a pH level of 6.0. The allowed variation is +/- 0.2 and if you go too much up or down it slow down the nutrient uptake and stop growth. This is why the pH meter is a must. These instruments are small and compact and they enable you to measure the pH level of your solution on daily basis. You can optimize the pH by using pH Down and pH Up solutions and keep it on an optimal level.
[amazon box=”B07CWDVJY9″ price=”hide”]
- PPM-EC meter – This instrument measures the electrical conductivity of the water. The more minerals are dissolved in the water, the higher the conductivity will be. This way you can roughly measure the amount of food for your plant in the water. Too much can kill your plant and too little will slow down the growth. While the pH level should be steady over the entire cycle, the PPM levels change during different growth phases.
- PPM-TDS – This PPM meter is a little more precise. It measures how much plant food there is in the water. To be really precise, you can measure the PPM level of the water you are going to use, and then add nutrients and measure again. After that, by simple subtraction you can determine the precise PPM level. This way you can always know how much nutrients are in your solution during the entire growth cycle.
[su_note note_color=”#eccdde” text_color=”#0d100c;”]Marijuana is one pretty resistant plant but if you want a perfect harvest, you’ll need to take a good care of it. So, keep the PPM and pH levels optimal. pH between 5.5 and 6.5, depending on the strain, and PPM between 900 and 2800 depending on the growth phase, and you should be just fine.[/su_note]
Marijuana nutrient cycle
The timer should start the pump which submerges the roots of the plants into the solution once every 20 minutes. The pump shuts down when the roots are in the solution. The roots will, of course, grow longer if they need more than 20 minutes to get water. They can actually grow pretty long in search for the nutrients.
The plant roots can grow so long that they can prevent the water and solution from going al the way up to the grow cups. Also, long and thick roots can clog the system. This is why you need to trim the roots every once in a while. Trim them to be short enough so they don’t touch the point where the solution goes into the cup holder.
Make sure that you don’t cut too much because you can kill your plant that way. You don’t have to throw away the old solution; you can use it to water your houseplants or garden.
Why shouldn’t you use soil?
In nature, organic matter decomposes in soil and breaks down to basic nutrients such as Potassium, Phosphorus, and Nitrogen salts. These salts are then dissolved in water and the roots of the plant absorb them.
So, if you want your plant to have a perfectly balanced intake of nutrients, everything must be perfectly balanced in the soil. This is impossible to achieve when using soil because of the contamination, biological imbalances, and insufficient amount of organic matter on the surface.
Soil can never produce so perfectly balanced and high amount of nutrients as the hydroponic system can. With the hydroponic system, you provide all of the necessary nutrients and take it directly to the root of the plant, so the root doesn’t need to search for it.
The soil loses a lot of nutrients and it is extremely difficult to measure the pH and PPM in soil. With the hydroponic system, these parameters are easily measured and adjusted so your plant can always have enough of required nutrients.
The nutrients in soil can only be dissolved when you water your plant, while in hydroponic systems, everything is dissolved in water and there is always enough moisture. Additionally, the soil can be the host for many different pests or diseases. Growing mediums for hydroponic systems are sterile and inert providing a very hygienic environment for your plant and you.
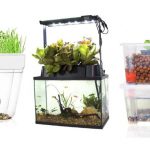
The hydroponic system set ups
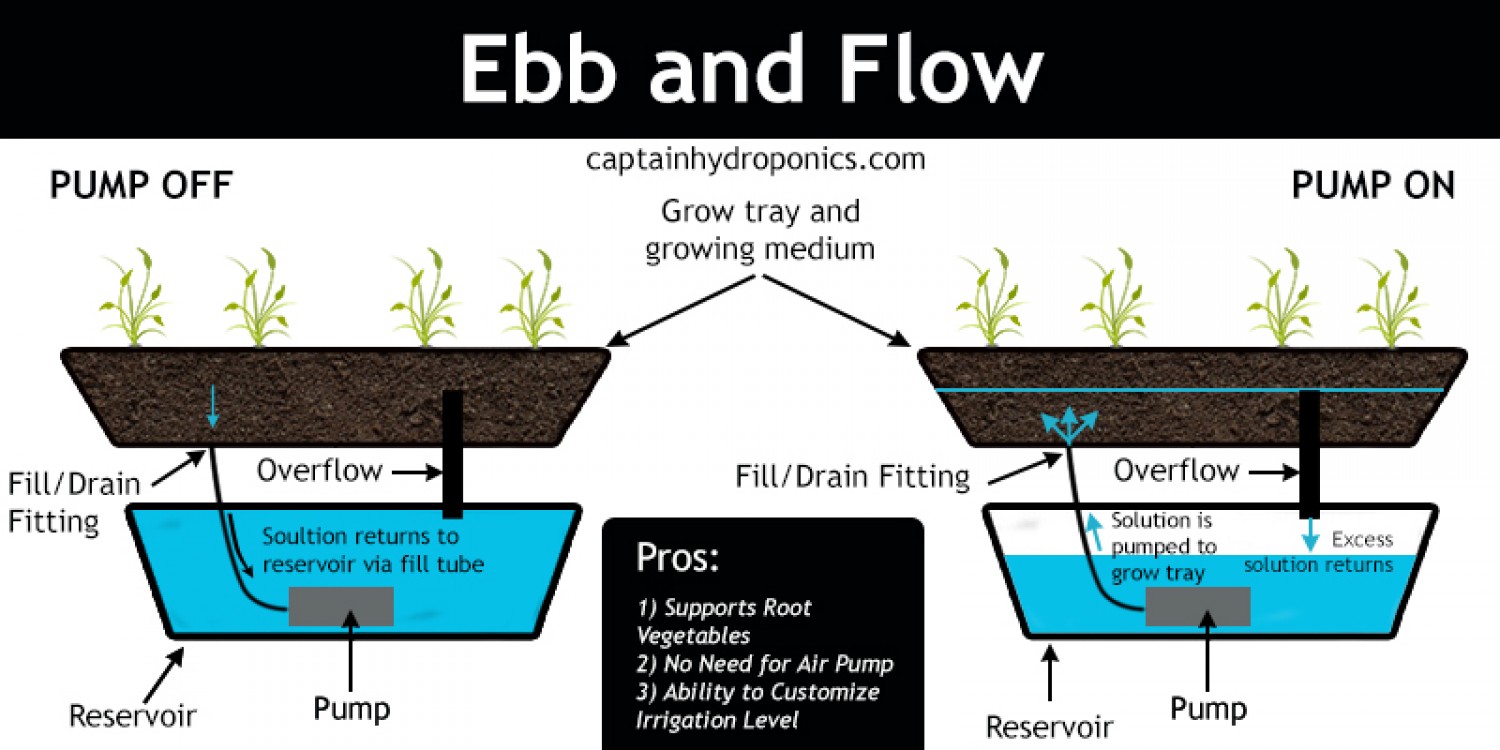
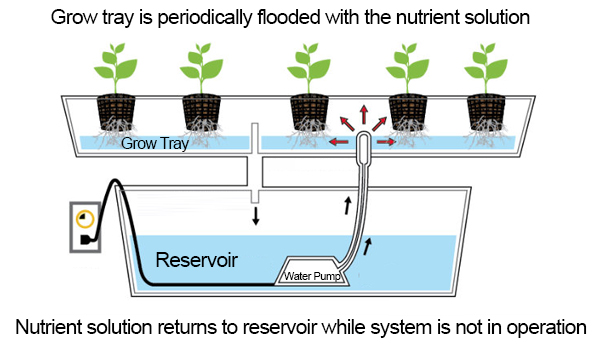
There are a few different hydroponic systems and the most popular one is the Ebb and Flow system. It is the most popular because it’s very simple and extremely easy to use. This system uses a reservoir that contains the nutrient solution and it’s placed under the growing tray.
The plants are supported by the soil-free medium that can be used as an anchor for the roots. The mediums are usually made of stone or fiber and are made porous so they can retain water and air.
The plants are in a tray that contains the growing medium (lava rocks or Rockwool).
The system requires a growing bed which is filed with a solution of nutrients by a pump connected to a timer. The pump is then shut down by the timer and the solution is slowly drained back to a reservoir.
[su_note note_color=”#a7ee9e” text_color=”#0d100c;”]Best Hydroponic Growing System[/su_note]
Ebb and Flow hydroponic system is quite simple and most popular choice because it doesn’t require too much work, it’s low maintenance, and it’s very productive. This system is ideal for beginners.
There are some things you need to pay attention no matter which hydroponic system you use. First of all – the reservoir. The reservoir holds the nutrients and the water that you need for the growth of your plants. Make sure that you pick large enough reservoir so it can hold enough water and nutrients for one or two weeks.
Also, make sure that your reservoir has a lid so you don’t lose too much water to evaporation. Locate your reservoir near the water source so you don’t have to use hoses or buckets. Make sure that you buy a sturdy reservoir and always buy 3 of them.
One reservoir you’ll need to hold the water and nutrients for your system. The second one is for holding the tap water in for 2-3 days so the chlorine can evaporate and neutralize the pH. And the third one is a spare one in case one of the two reservoirs you are using breaks.
The reservoir should be insulated so you can control the temperature of your nutrient solution and it’s probably best if you can elevate it a bit so the air can flow all around it.
Essential pieces of the hydroponic system that you most definitely need are pH and PPM meters and nutrients for both vegetative and flowering stage.
If you are not buying a kit that contains everything you need, it is advisable that you buy all of these components separately and in different stores so you don’t look suspicious.
[amazon bestseller=”best hydroponic systems” items=”3″]
Other systems to consider
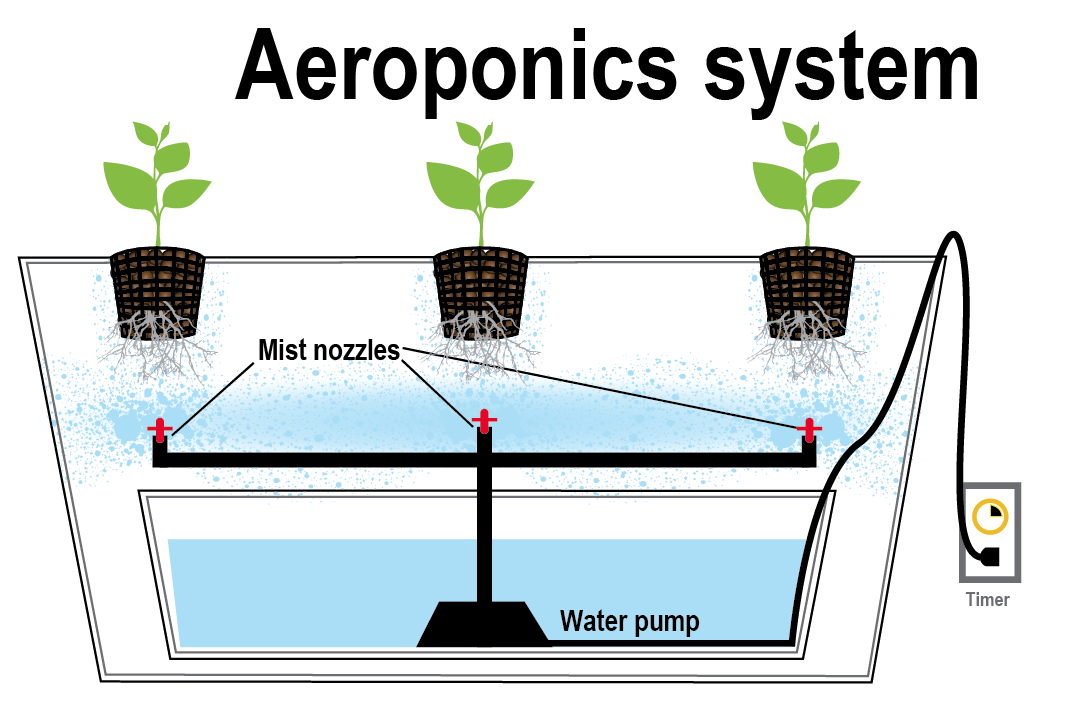
Aeroponics
This is the hydroponic system that doesn’t require any growing medium. You might only need a small amount to germinate your seeds. The roots are hanging in mid-air inside of a chamber which you keep at 100% humidity. The sprinklers spray a fine mist of solution allowing the roots to absorb the nutrients while remaining highly oxygenated.
This system allows the plant to grow even 10 times faster than in soil and almost no water is lost to evaporation. The chamber for the roots is lightproof and waterproof, which helps the system to create a highly humid environment.
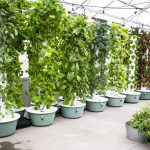
The latest aeroponic systems are so-called “tower gardens”. These are vertical set-ups that save a lot of space and are ideal for both outdoor and indoor grow. They recycle all of the water.
The aeroponic systems are great because they save on water and the high oxygenation allows the plant to use nutrients more efficiently but it has its downsides. First of all, it is a quite expensive system and it is not so stealthy because of the noise it produces. Additionally, it is very vulnerable to even short power outages.
[amazon box=”B00O9GRTC8″ price=”hide”]
Continuous Flow
Continuous flow is any system which provides a continuous flow of nutrients to the root of the plant. It usually uses a PVC pipe with holes on the top where you put the pots with plants and the nutrient are constantly supplied to the root inside the tube.
There are few continuous flow systems and the most common ones are Drip Irrigation and Nutrient Film Technique.
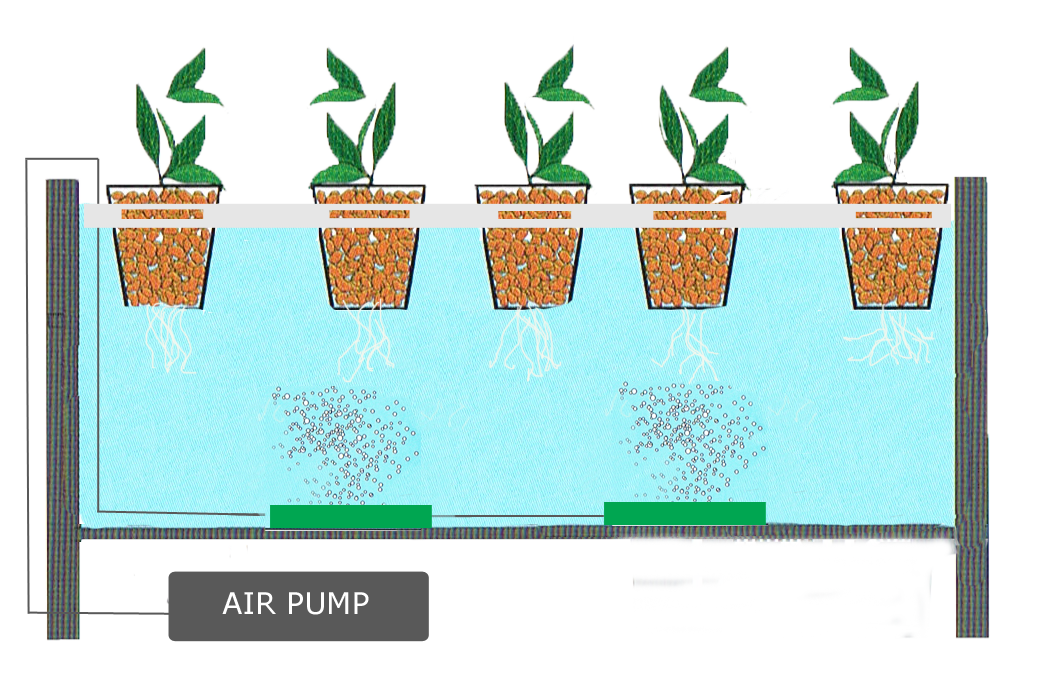
Deep Water Culture
This is one quite simple but very effective way for growing marijuana. It is pretty similar to the aeroponic system in some ways, but in this case, the roots are completely submerged into the nutrient solution.
We all know that without oxygen your plants will die. This problem is solved by simply adding an air rock that is used for fish tanks and there you have it- enough oxygen for the root of your plant.
This system is ideal for beginners because it is extremely easy to build and you can practically make everything from the items you already have at home. It is one of the cheapest systems and it guarantees the fast growth.
[amazon box=”B00CHEIO6Y” price=”hide”]
[su_note note_color=”#f1fcdb” text_color=”#0d100c;”]Best DWC Hydroponic System (Deep Water Culture) Reviews[/su_note]
Drip Irrigation
Drip irrigation I an awesome way to save water and nutrients. The water and nutrients are fed to the plant from above. It can be used for both outdoor and indoor grow and for both soil and growing medium.
The drip irrigation system includes small droppers that you place above the soil or grow medium next to the stem or the root and it drops the small drops of solution drop by drop. This way you save a lot of water and nutrients and losses to evaporation are minimal.
The system is very silent making it great for stealth growers and it enables you to grow more plants in smaller space.
This water efficient system is perfect for areas like California because it doesn’t use so much water as the most of hydroponic systems and it can help resolve water issue.
Marijuana Lighting
Since the modern hydroponic systems began, most people used HID (High Intensity Discharge) lights such as High Pressure Sodium or Metal Halide lights for growing, and lately LED lights. The closest to the regular room light is a metal halide light and it is best for vegetative phase of growth.
High pressure sodium lights offer more of the orange, red and amber light and these are best for use in later, flowering stages. These two are usually used together for different phases of growth or at the same time.
HID lamps provide enough light for proper growth of your plants but they also waste a lot of energy in a form of heat which has to be managed with a proper ventilation system. These lamps also require a ballast, so you need to buy that too.
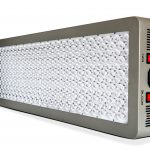
Professional growers have turned to full spectrum LED grow lights lately because they give you much more control, and they don’t use as much electricity as the HID lamps do. Also, space and the heat issues are decreased.
The LED lamps offer a spectrum tuned perfectly for all growing stages, they don’t require a ballast and are generally a better solution than the HID lamps.
[amazon box=”B015FLSOCE,B07TVD1Y3K,B07FN3X6H7″ grid=”3″ price=”hide”]
Light cycle timing is very important. The marijuana, both cannabis indica and cannabis sativa use night/day light cycles for triggering crucial growing responses. When you grow weed indoor it is very important that you understand the difference between vegetative and flowering phase light cycle.
So to put it as simple as possible: MH lamps produce the highest proportion of blue wavelength light which is ideal for early growing phases because it promotes the bushy and compact plants. HPS lamps, on the other hand, produce more orange and red wavelength light and a small amount of blue range, which helps you trigger the bud formation and enhances the flowering.
Basically, you can use the HPS lamps for the entire growth but then the plants will be taller and less bushy. This is why most of the growers tend to use Compact Fluorescent Lamps to compensate the blue light for a vegetative phase.
The CFL lights are not producing as much heat as the HPS and MH lamps do so you can place them closer to the plants and the newer CFL grow lights are also producing the light in the orange end of the spectrum.
The full spectrum LED lights, however, offer a much better value for the price. They enable you to grow from seed to bud with just one light. They also use only 50% of the electricity HPS lights use and they don’t produce the heat.
Grow light timing
After the seed germination is finished, the plant moves to the vegetative phase of growth. This phase is known as the “photoperiod” and it’s in direct relation to the hours of dark and light.
You can effectively dictate the growing cycle of your plants by controlling the amount of light they are receiving. The vegetative growth can easily be replicated by simply using the time that will keep the lights on for 18-24 hours and then turning them off for the rest of the day giving them 0-6 hours of darkness.
You can use either MH/HPS combination or the LED lights for this phase. The HPS lights are not so active in a blue/green part of the spectrum and not very useful during the early vegetative phase.
Because of the heat generation, the MH lights can be quite harsh to your plant during the early phase so if you are planning to use HPSs later, maybe it’s best that you start with LED or CFL lights.
This is because you are trying to replicate the natural condition, and the marijuana plants germinate and start to grow in spring when it’s not as hot as it is during the later phases.
The plants in nature will start to flower at the end of the summer when the days become shorter. To trigger the flowering phase you’ll need to switch to a different light cycle. Simply give your plants 12 hours of light and then 12 hours of darkness and this should trigger the flowering phase.
Make sure that you do this when your plants are between 12 and 20 inches tall to maximize the harvest. Once you triggered the flowering phase, you will notice the change in one or two weeks. It is extremely important that you remove the male plants when you notice them because males don’t produce buds, only pollen. The pollen can cause that your female plants have seeds in the buds and no one likes to smoke seedy weed.
[amazon bestseller=”cmh Grow Lights” items=”1″]
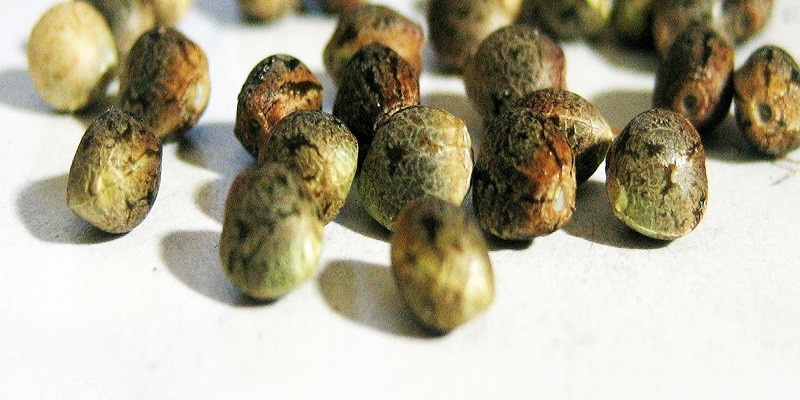
Marijuana seeds and clones and where to buy them
You can always save some seeds if you find them in some good weed you smoked, or you can ask someone who grows weed to give you or sell you few clones. If none of this is the case, you can simply order some seeds online.
It’s important that you know that there are two types of marijuana strains. There are Sativa and Indica. Both of these have their unique characteristics and properties and they vary in the type of high, growing conditions that are required, yield, size, and strength.
It is quite helpful if you know a bit about the strains so you can decide easier which seeds to buy and how to cultivate them.
The Cannabis Sativa is the original strain of marijuana and it originated from Africa, The Americas, and Asia. The properties of the plant may vary, depending on the origin, but they are generally similar.
The Sativa plants grow tall and have a leggy statue. The buds are looser than those in Indica. Sativa grows fast and it’s very potent strain with a high THC level and it gives a very energetic high.
The flavor is usually fruity and sweet, and the plant doesn’t have a too strong aroma, making it ideal for stealthier growing.
When it comes to Cannabis Indica, it originates from India and indoor growers just love this strain. This is because it grows bushy, it produces snugly packed buds, and it has a compact system of the roots.
The color of the leaves is much darker than Sativa and in some strains it can even be purple. This is due to the high concentration of chlorophyll which enables them to process the light much better, resulting in faster growth and better bud production.
The smell is heavy and strong and so is the high. This is due to very high THC-CBD ratio. It has much more intense taste than Sativa.
Now, when it comes to seeds, one of the most amazing things on the market is auto-flowering seeds. These seeds have shown huge success on the market since they were first introduced a few decades ago. The auto-flowering seeds will begin flowering phase as soon as they reach proper maturity level even if you don’t trigger the flowering phase.
Most of these seeds are hybrids of sativa and indica and ruderalis strains. The Ruderalis strain is the strain that evolved into existence in the northern parts of Eastern Europe, where the days are endlessly long and when the days get shorter it is way too cold for the plant to survive.
This is ideal because you don’t have to separate rooms for vegetative phase and flowering phase and you can grow plants of different ages all together. Additionally, these plants have much shorter vegetative phase and they will start to flower after only 3 weeks.
You can buy some of the best and most popular auto-flowering seeds online.
Anyway, when you are growing your own weed, you don’t want any males, right? Cloning and sexing is quite difficult for beginners and you don’t want to wait so long until you can tell the difference between males and females.
The answer for this problem is FEMINIZED SEEDS. The feminized seeds produce only female plants and they offer a great quality and great harvest. The potency and the flavor of the weed produced from these seeds are much better than in the weed produced from non-feminized seeds.
To buy the best feminized seeds online, follow one of these links:
[su_note note_color=”#f1fcdb” text_color=”#0d100c;”]Best Online Seed Banks That Can Ship to the USA[/su_note]
So what is the difference between indoor and outdoor seeds if there is any? Well, that depends on the optimal growing conditions for that specific strain. Most of the strains come from tropic areas and therefore require they need higher humidity and temperature. If you don’t live in this type of climate, you want to grow these indoors so you can replicate their natural environment.
Some of the strains that come from the north require more daylight so you’ll need to give them more hours of light and cooler temperature. If you live in the area where the plants labeled as “indoor” can grow outside, you don’t have to set up any indoor grow systems, etc.
[amazon bestseller=”marijuana seed” items=”3″]
How to germinate the seeds?
Before germinating your seeds, set up the hydroponic garden and make sure that everything is working. Now, if you happen to use clones, you can skip the part about the germination.
There are many different mediums for growing available. The medium is the substance in which the roots of the plant grow. You need the growing medium because you don’t use the soil in the hydroponic garden and therefore you need a substitute. One of the most popular ones is the Rockwool.
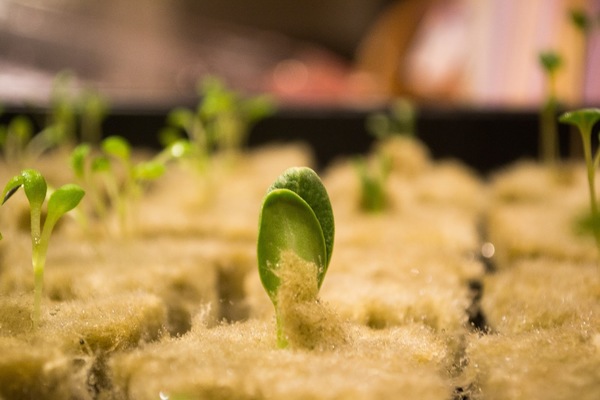
The growing medium doesn’t provide any nutrition for the plant; it is there only to support the roots, and the nutrients come from the nutrient solution. What you want to do is to take the seed and surround it with growing medium and then submerge the bottom 70 percent of the cube into water.
[amazon box=”B016AXFDZM” price=”hide”]
Make sure that the top of the cube is above the water so the seed in not submerged. After the seed germinates and you have the root that is about 1/8 of an inch long you can take the seed and place it, root down, on the growing medium in your hydroponic garden.
Vegetative phase of marijuana growth
After the seed germination, the marijuana plant will start the first stage of its development – the vegetative phase. In this phase, the plant establishes a strong root system and develops full leaves for photosynthesis while preparing for the flowering phase when it creates the buds.
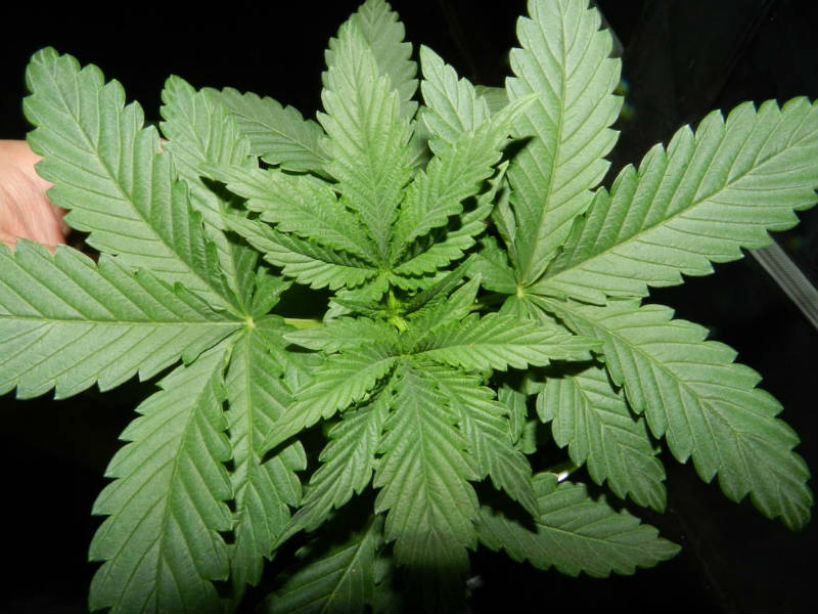
In this phase, the plant requires 18-24 hours of light during the day. It’s best that you start with your lamp placed about 20 inches above the top of the plant to avoid drying your plant. After that, you can start decreasing the height daily until you reach the distance you like.
The vegetative phase for most of the indoor marijuana plants lasts only 2-4 weeks, depending on the strain. The speed of the growth of the plant depends mostly on how much energy the plant produces. More big leaves – better photosynthesis. Better photosynthesis – faster growth.
If the conditions in your grow room and hydroponic garden are ideal, the plant can grow even 6 inches per day.
Somewhere in the middle of this phase, the number of the blades on the leaves will start to decline and the distance between two sets of leaves will get shorter. It is very important that you keep the ideal room conditions and give your plant a proper lighting for vegetative phase.
[su_note note_color=”#f1fcdb” text_color=”#0d100c;”]Best Vegetation Stage (Vegging) Tips for Marijuana[/su_note]
Light for vegetative phase
During the vegetative phase of marijuana growth, the 14 percent of the light needs to be a blue light in order to prevent the stretching. If you don’t provide the plant with enough blue light your plant will be weak with long space between branches.
HPS lamps give about 2-6 percent of blue light and therefore are not so suitable for this phase. Most popular choices are full spectrum LED lamps and MH lamps. Some of the growers also use the CFL lamps, but these are not as efficient as the MH and LED lamps.
Relatively new lamps on the market are CMH lamps (Ceramic Metal Halide). These display much fuller spectrum than the standard Metal Halide lamps.
Usually, you’ll need 18 to 24 hours of light per day, and if you choose less than 24 hours it is highly recommendable that you use the timer. Of course, how much light you need depends on many factors including spacing between the plants, temperature of the room, the reflectivity of the walls, the distance between lamps and plants, maturity of the plants, efficiency of the lamps, etc.
The most recommendable are 50 Watts of power per square foot, but with the LED lamps, you can use much less. Covering the walls with something reflective is also recommendable so you can use the photons that are not directed toward the plants.
Grow room conditions
A suitable temperature of the air in grow room is very important for good germination and growth. The temperature range that the plants will tolerate is from 60 degrees to 92 degrees Fahrenheit, but the ideal temperature would be between 70 and 83 degrees.
While the plants are using the CO2 higher temperature range is recommendable, while the lower temperature is better for the dark period. The best solution when it comes to temperature is to stick between 72 and 77 degrees during the entire growth period.
The plants use both CO2 and light for photosynthesis. This plus the heat from the lamps are the reasons why the grow room needs to be ventilated. Exit vents and intake vents are very important because they bring CO2 enriched air into the grow room and expel CO2 depleted air out.
The ideal solution would be to have an extraction fan on the ceiling that will facilitate the air flow. You’ll need to buy a fan that will change the air in your growing room once every 5 minutes. This depends on the size of the room and the volume of air that fan can move.
It is also recommendable to use the oscillating fans, especially during the flowering phase. Because the buds are packed tightly, they are susceptible to molding.
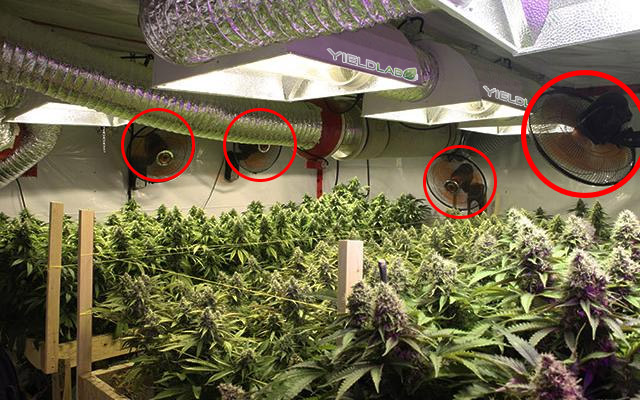
If you use an oscillating fan you are also helping your plant to straighten its stems. In nature, when plants are bent by the wind, they create small fissures which are then replaced with a scar tissue, making the stems woody and stronger.
[amazon box=”B074XBXFPD” price=”hide”]
Without this kind of movement the stems of your plants will be weaker and plants more fragile.
If your growing room doesn’t have any walls that you can put exterior vents on and the air needs to be moved a long way, you’ll need some ducting. The ducting usually comes in standardized sizes and it fits most of the fans.
Flexible ducting is extremely easy to work with but you will want to keep the straight lines as much as it’s possible because too many curves and corners can affect the efficiency of the ventilation system.
Fresh air contains around 390 PPM of CO2. Your marijuana plants can use 1500-2000 PPM. Some of the growers like to augment the supply of the CO2 to the plants which can increase the yield. This is a bit expensive but it’s totally worth it.
If you don’t have enough money for this, you don’t have to worry. Your plants will still produce.
The most effective way for the CO2 supply augmentation is to buy CO2 bottles and kit from the store and regulate the flow by the timer. You can run the CO2 through the pipes with tiny holes above your plants. The CO2 is heavier than air and it will fall down on your plants. Just remember to set the timers so the CO2 flow turns on when the fans are turned off.
There are, of course, cheaper ways to supply your plants with additional CO2. You can use dry ice or mix baking soda and vinegar in order to create CO2. Never use fumes from a propane heater because these can contain some dangerous gasses and these heaters represent a fire hazard.
How and when to switch to flowering (budding)
There is not really a correct answer to the question: WHEN? Some of the growers like to switch to flowering after only two weeks in order to create small plants with a single bud, while some wait for up to 3-4 months for the plant to grow and they create monsters. When will you switch to the flowering phase depends only on your personal goals.
Remember that your plant will continue to increase the height even when you switch to flowering phase. You switch to flowering phase by changing the light cycle to 12 hours of light and 12 hours of darkness, as we already explained in the “Grow Light Timing” section.
How much the plant will stretch after switching to flowering depends on the strain, but the general rule is that the indica will double in height and the sativa will triple. This information is useful because you can determine when to end vegetative phase. You’ll need to consider the height of your grow room, how high your lamps can go and based on that decide when to switch to flowering.
Of course, the auto-flowering plants will switch to this phase whenever they are mature enough, regardless of the light cycle.
Flowering phase
During the flowering phase, marijuana produces the most of the THC, CBD, and CBN, which are the ingredients that make you high when you smoke the buds. When the flowering phase begins, the plant will grow slower because all of the energy that plant produces is now used for the flowering process.
The plant needs to be at least 6 inches high and to have four sets of leaves minimum before you switch to flowering phase. In most of the hydroponic gardens, this takes two weeks to one month. If you switch while the plant is very small, it will continue to grow for two more weeks and after that, all of the energy will be used for formation of the flower.
Limiting how high your plant will grow is quite a difficult thing to do. One of the easiest methods to do this is to raise the lights as the plant grows. There are actually a few of the methods to successfully limit the height of your plant, but none of those methods is actually easy.
Depending on the strain, the flowering phase usually last somewhere around two months or a bit longer. This means that you’ll need between 3 and 4 months from seed to harvest with a hydroponic system.
During the flowering phase, the darkness period must be completely dark. The plant must get 12 hours of perfect darkness every day. This means no daylight, no room light, or any other light during this period.
Any light stronger than moonlight during this period can delay the flowering. If this continues it can happen that the plant doesn’t flower at all.
When you see something that looks like tiny white hairs at the bud sites you’ll know that the flowering has begun. You should see these after approximately 10 to 14 days of the flowering phase. Now it is time to remove male plants if you have any.
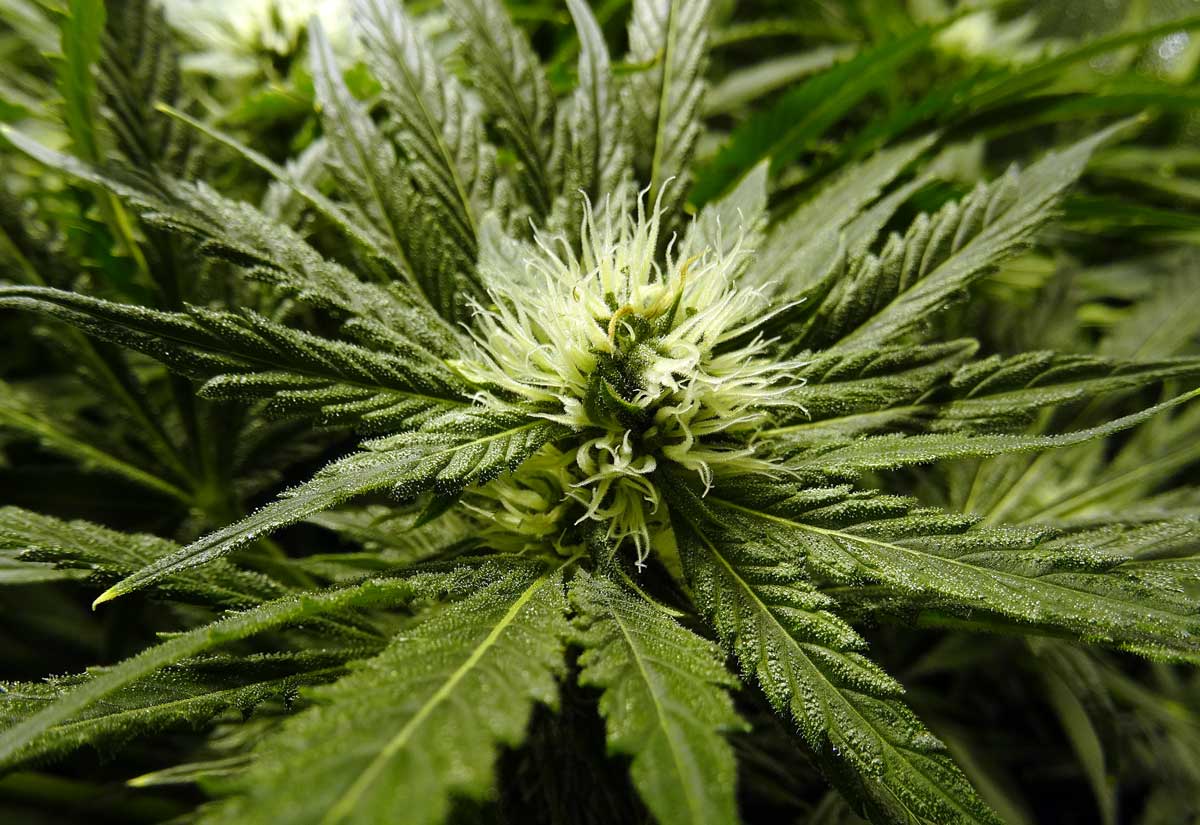
These tiny white hairs will, after some time, become the red or the white hairs that will turn into big nice buds.
If you need to work in your grow room during the periods of darkness you can install the green light bulbs because the green light will not affect the plants.
[su_note note_color=”#f1fcdb” text_color=”#0d100c;”]Best Flowering Stage Tips for Cannabis | Flowering Stage Week By Week[/su_note]
Harvesting, curing and storing marijuana without smell
All of your hard work comes to this. Now that you have grown your plants, it is time for harvest. All of your plants are now nice and big with nice fat buds. This is the stage where your choices will determine the quality of the final product.
To produce the perfect buds there are 3 key steps to follow:
- Timing of your harvest
- Proper drying
- Proper curing
It is important that you follow this guide in order to maximize the THC and CBD contend and produce the best buds you have ever smoked.
When is the best time to harvest?
Timing your harvest is very important if you want to maximize the content of active substances in your buds. If you harvest too early you will probably have a low content of THC and CBD, but on the other hand, if you harvest too late these same substances will start to deteriorate.
[su_note note_color=”#f1fcdb” text_color=”#0d100c;”]When and How to Harvest Weed[/su_note]
Maximizing the THC in the bud
This nice psychoactive substance is present in the entire plant but the highest concentration of it is in the resins of the bud. These crystals (the trichomes) start to form during the flowering phase but they will begin to coat the bud only during the last week of this phase. You will maximize the THC content if you wait for the trichomes to be fully developed.
If you wait too long the glands of the resin will degrade and the THC will break down and form CBN. CBN gives you the sedative effect and very unpleasant sensation. You don’t want that and this is why you need to time your harvest.
[su_note note_color=”#f1fcdb” text_color=”#0d100c;”]How Long Does Weed Stay In Your System[/su_note]
Best THC testing kit on Amazon:
[amazon bestseller=”THC testing kit” items=”1″]
Maximizing the CBD in the bud
CBD is the cannabinoid that has many medicinal effects such as painkilling and anti-nausea. It is not psychoactive but it interacts with THC and improves the high. The CBD doesn’t degrade like THC, but it has been proven that CBN can increase the effect of CBD. This means that you should wait for some of the THC to degrade to CBN so you can benefit from the CBD.
You can see how timing is important. After all, you didn’t go through all the hard work just to lose your precious THC or to miss the potency of the buds by harvesting too early.
Most of the seed providers will give you a rough estimate of the time that strain needs to flower before you harvest it, but this can depend on many factors. But luckily there are many signs that can tell you when it is time to harvest.
As the flowers on your plant grow, they will eventually merge into big kolas. You will then see tiny crystals around the flowers and they will become stickier. Some of the bigger leaves will become yellow and this is completely normal. You can even remove those leaves if you want.
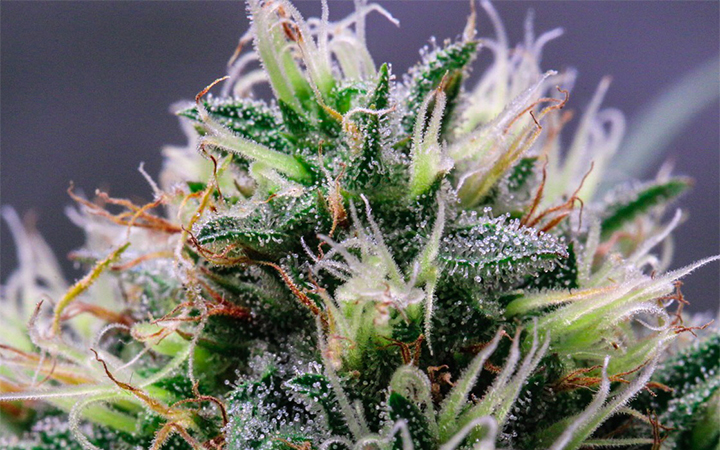
The color of the trichomes is what will show you when it is time to harvest. The trichomes are the structures on the flower that produce the resin. This is where all that beautiful THC is. Don’t confuse the trichomes with the pistils. The pistils are the long hairs on the flower.
In order to inspect the trichomes, you’ll need a magnifying glass. You can buy this very cheaply on amazon or eBay.
As your plant matures, the trichomes on the flower will go through three stages. In the first stage, you will see that the trichomes are swelled and shaped like a mushroom. In the second stage, they will turn from clear to milky. In the third stage, the trichomes will begin to turn brown or amber.
So this is how you choose when to harvest, depending on what kind of the high you prefer. When the trichomes are turning milky, that’s when the THC level is the highest. The CBD develops a bit later than THC. When the trichomes become amber or brown, the most of the THC has turned into CBN. So you practically need to observe the trichomes and decide when you will harvest the buds.
Generally, the longer you let your plant to flower the more stoned you will be when you smoke it.
Flushing
Before cutting your plant down, you should consider flushing it. Because you feed the nutrients to your plant it is possible that some of the salts are accumulated in a plant for a later use. What you want to do is to flush your plant with clean fresh water every 10 days to prevent a nutrient lockout. Also, it I not a bad idea to flush your plant for a few days before the harvest to ensure the high-quality tasty buds. 5-7 days of clean water should be enough. It might happen that some of the leaves become yellow because of the nitrogen deficiency, but at this stage, you don’t have to worry about it.
Chopping down the weed
Before you cut the branches make sure that you remove the larger leaves. This is quite easier to do while the plant is still standing. Some people remove the smaller leaves but it’s better if you leave them on during the drying stage because they will protect the trichomes and slow down the drying process which preserves the flavor and potency of your buds.
You might want to cut and hang to dry the entire plants, but it is much better to do this in sections. Hang each branch separately and make sure they don’t touch each other. Using sharp scissors, cut each branch from your plant and remove the large leaves if you didn’t already.
Handle the branches carefully because you don’t want the trichomes to drop off. Now it is time for drying.
How to dry marijuana
The marijuana is one of the most diverse plants when it comes to flavors and smells. The delicate flavors of each strain depend on over 100 flavorful flavonoids and terpenes contained in the plant.
If you don’t dry and cure your weed properly, you can destroy these molecules resulting in tasteless weed that smells awful. There are three ways to preserve the terpenes. First of all, you want to dry your weed slowly. Yes, if dry them faster you will get to smoke them sooner, but then you’ll have a bland, light weight buds. Slow drying preserves the flavor, the smell and the weight of your buds.
Second important thing is the air circulation. The good air flow around the buds during the drying process will prevent the development of fungus and mold. We all know how these can ruin the aroma of the buds.
[amazon box=”B071NZL77N” price=”hide”]
Last but not least, the proper curing. It is recommendable that cure the buds for 2 to 4 weeks. This will bring out the terpenes and make extra tasty buds.
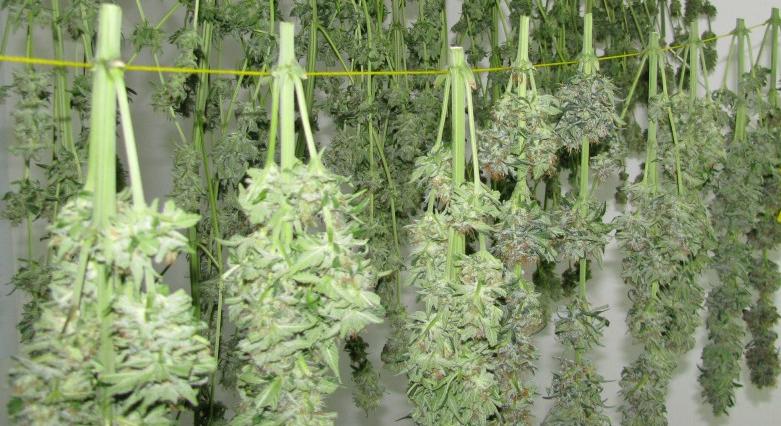
The area where you are going to dry your buds should be dark and ventilated. You want to hand the branches of your fresh weed upside down with enough space for each branch. The good ventilation is very important. You can even use the fans but don’t point them directly to the buds. You want the circulation of air, not hurricane blowing on them.
The higher heat will dry your buds faster but that is not necessarily better. The normal room temperature will do. Make sure that you inspect your plants regularly to see how they are doing and occasionally turn them around so the air flow can reach to all the parts of the buds.
Drying can last from a few days to a couple of weeks. Usually, it’s around one week. The weed is dry enough when the branches crack under your fingers.
At this point your weed is smokeable, but if you want the best possible potency and flavor you’ll need to cure your weed.
[su_note note_color=”#f1fcdb” text_color=”#0d100c;”]Drying Your Marijuana Buds[/su_note]
How to cure marijuana
First of all, you need to trim the buds before the final curing. Use a pair of sharp and clean scissors and remove any remaining leaves on the buds. This is a partly aesthetic process and it is up to you to decide how much will you trim. Of course, don’t throw away the leaves. These are also full of trichomes and you can smoke that to make the trimming a bit more interesting.
When you finish the trimming, separate the individual buds from the stems. The buds should be stored in a glass jar. Actually, any plastic bag will do the trick but the glass jars are the best option for this.
For the first two weeks, it is recommendable that you open the jar once or twice every day and let them breathe for around 15 minutes. This way you allow any remaining moisture to evaporate.
Now everything is ready for smoking. Depending on the strain, the buds will cure at a different rate but if your weed is stored properly, you will see that it gets even better over time. The good curing adds a perfect finishing touch to everything you did in your grow room.
[su_note note_color=”#f1fcdb” text_color=”#0d100c;”]How to Cure Weed[/su_note]
FAQ
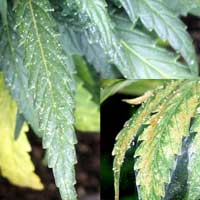
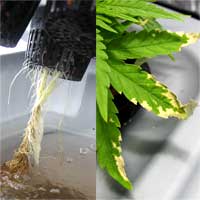
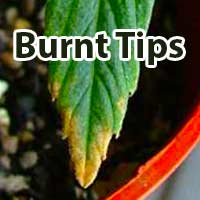
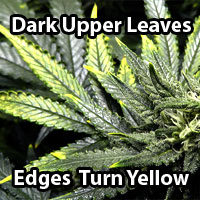
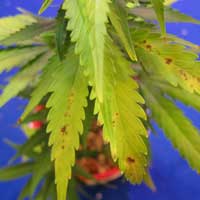
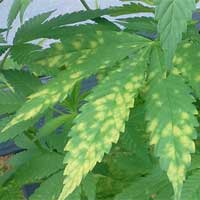
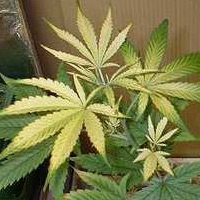
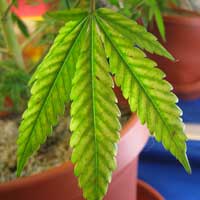
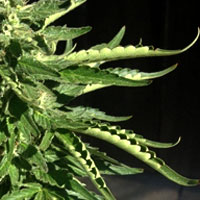
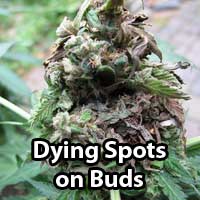
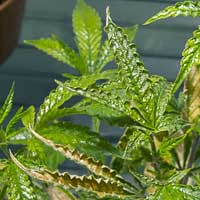
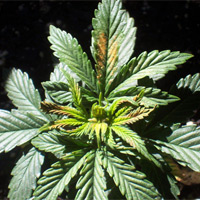
Q: My plant looks sick, what is wrong with it?
A: The plant can show signs of sickness for many reasons. Nutrient toxicity, nutrient deficit, under-watering, over-watering, pests, pH issues, and bad environment control are just some of the reasons that can cause this. People who grow weed with hydroponic systems usually have more pH problems than the others. The first thing to do in this case is to check the pH and nutrients. If everything is ok with these, you might want to check pitcures belowfor help:


Q: Why do I need to pH the nutrients?
A: the proper pH level of your nutrient solution makes it easier for your plants to uptake the necessary nutrients at any time. If you don’t manage the pH level of your solution your plant will suffer.
Q: Where do I buy the seeds?
A: It’s best if you use the seeds that you found in the buds of good weed you’ve smoked or to buy them from a fellow grower that you know. If none of this is the case, you can always order the seeds online from the secure seed banks.
Q: What is better? Soil vs hydroponics
A: This pretty much depends on the grower, but in my personal opinion, the hydroponic systems are way better than the soil in every possible category.
Q: How do I hide from my parents or roommates that I’m growing marijuana?
A: If you are not living alone and your living space can be inspected without warning, I strongly recommend that you do NOT grow the weed until you have better living conditions. If you live with your parents or roommates there are some issues you will have to deal with, like explaining the increased energy bill, or needing the place where you can operate without interruption, total darkness for 12 hours straight, covering the smell, etc.
Conclusion
The hydroponic systems are maybe the best systems for indoor growing of marijuana. They are not that complicated to use and some of the systems are so easy to use even the complete amateurs can set them up and grow some high-quality weed.
Yes, some of the systems require more money but the results are totally worth it. Most important thing here is dedication. You can’t just set up the system and come back to see it in two weeks. You have to visit the grow room daily. You need to make sure everything is ok. You need to provide the perfect conditions at all times. And most important of all – you need to love your plants.
With so many different strains, you have so many choices. Maybe the first strain you pick won’t be your favorite, but you will most certainly like it. It’s the weed after all. But after some time, you will be more experienced and you will find your favorite strain.
It might happen that you don’t do everything properly on your first try, but don’t be discouraged. Never give up because the reward is pure awesomeness. You will never enjoy the weed as much as you will enjoy the one you grew by yourself.
Also, always make sure that you stay safe from the police and try not to be suspicious. We all know that weed is just a harmless plant that has many medicinal effects and that nothing bad will happen if you smoke it, but the law doesn’t agree with as for now. Until they make the weed legal everywhere, stay safe and hidden from the eyes of the law enforcement.
All of my knowledge gathered here comes from the books that I mentioned in the beginning of the text and my personal experience. I also recommended a few of the alternative methods that I tried so you can choose the most suitable one for you.
Yes, I know that the text is a bit longer one, but the books on the subject are way longer. I tried to explain everything as simple as possible and I hope that you will find this guide helpful. I wish you all the luck in this world and I’m looking forward to hearing your feedback.
Reading another guide for beginner:
[su_note note_color=”#f1fcdb” text_color=”#0d100c;”]
PS: Due to the effect of covid 19, many products on amazon stil not unavailable, so I tried to find some other quality supplies, you can click on the image bellow for more information.
New Product: ( On 2021)
1: Thebudgrower ALL-IN-ONE HOME GROW KITS

[su_button
url=”https://shareasale.com/r.cfm?b=1730286&u=2406711&m=86271&urllink=&afftrack=0″ target=”blank” rel=”nofollow” background=”#008000″ size=”6″ icon=”icon: hand-o-right” icon_color=”#ffffff”]Check For More Information[/su_button]
2: Super Closet BEST-SELLING GROW CABINET
[su_button
url=”https://shareasale.com/r.cfm?b=618865&u=2406711&m=31788&urllink=&afftrack=0″ target=”blank” rel=”nofollow” background=”#008000″ size=”6″ icon=”icon: hand-o-right” icon_color=”#ffffff”]Check For More Information[/su_button]
3: Apotforpot COMPLETE KIT TO GROW CANNABIS AT HOME
[su_button
url=”https://apotforpot.com?aff=342″ target=”blank” rel=”nofollow” background=”#008000″ size=”6″ icon=”icon: hand-o-right” icon_color=”#ffffff”]Check For More Information[/su_button]
Top 5 Complete Grow Room Kit On Amazon:
[amazon bestseller=”grow tent kit”]
More from my site


Thanks for sharing this guide on Hydroponic Marijuana Grow. I have recently thought of trying the hydroponic way of growing cannabis, and was looking for tips. Needless to say, your blog helped me a blog to understand the whole process. Cheers!
Hi i am in day 5 since I planted my seed in oasis cube and kept it moist all the time. Now it has germinated and I can see tiny leaves and the height of plant is 3inches. Now, I have exposed it to sunlight for 10hours and rest under a led strip for 8hours. They temperature right now is 77F° and the light source is 10inches above the plant. Am I doing it right!? I don’t have the greenhouse kinda structure. But currently doing it in my living hall.
Hello. I have commercial LEDs for the veg and flower phase. I also have a 25 watt UV light. At what part of growth process should I apply it?
Hi John, You can use UV light when You want increases oils & resins that contain THC & CBD
Do other hydroponic growers have problems with keeping the water cool enough not to cause root rot?
Hi Thanks for this great page on growing. I came here looking for basic information on hydroponics and you explained the differences in the methods very nicely. I am in my first weed grow. I am using soil because I wasn’t ready for the hydroponics. I might try that on my next grow but for now I have 1 Maui Wowie and 1 Durban Poison growing in a 4x4x80″ tent. Just a basic set up and watching the plants grow slowly. This guide peaks my interest in going hydroponic so again thank you.
Hope you will success,Robert 😉
How did it come out?
Hi. I grew beautiful plants with fragrant sticky buds. But when I cut and dried them. They had lost there smell totally. What do u think I did wrong?
Don’t worry Deb, its normal. It will smell almost like freshly cut hay for a while. Once its out of the bags, and curing in your jars, the smell will come back in spades within a week or so.
Different people have different methods. I do mine as follows:
I chop down my plants, and trim the leaves off, so that I have buds on stalks. The stalks are then hung up to dry for 10 – 14 days, or until the stalks become brittle.
I then cut the buds off the stalks, and brown bag them for about another week, and then put the finished buds in a big jar that once contained cadburys roses :yep:
I open the jar once a day and make sure that the buds are nice and dry – move them around a bit to let them breathe, and then leave them (well, OK, I smoke them, but you find the longer they cure in the jar, the more potent the smell, taste and strength – I have no patience you see)
Hi thanks, Great info simple effective good advice is priceless and you have delivered. Not a complete guide but perfect for beginners
Thanks Spike 🙂
I’m wondering if you can share some information about growing hemp as opposed to marijuana plants. I have recently started using CBD Oil, which I prefer over weed but there isn’t much information on growing it yourself. Thanks and hope you can help. Mike
More and more people nowadays are interested in growing hydroponically. Some of them do not know how to start and what it really means. I think its a great idea to share this information.
I only share all knowledge i know about gardening. I know the difficulties the new grower will be faced